
So, you’ve decided to start learning Java—awesome! Java is one of the most popular programming languages, and it’s a solid choice whether you’re a beginner or already coding in other languages. But before we dive into coding, there are a couple of things you need: the JDK (Java Development Kit) and an IDE (Integrated Development Environment) to help you write, run, and test your code.
In this post, I’ll walk you through how to install JDK 21 and set up IntelliJ IDEA on Windows. Let’s get you started!
What is JDK and Why Do You Need It?
The JDK (Java Development Kit) is basically your toolkit for developing in Java. It includes everything you need to write and run Java programs: the compiler (to turn your code into something your computer understands), libraries, and the Java Virtual Machine (JVM), which is what actually runs your Java programs.
We’re going to install JDK 21, the latest Long-Term Support (LTS) release. This version will be supported for several years, making it a reliable choice for learning and beyond.
Step 1: Installing JDK 21
- Download JDK 21:
- Head over to the official Oracle site to download JDK 21.
- Choose the Windows version and download the installer.
- Install JDK 21:
- Run the downloaded installer and follow the instructions. It will usually suggest installing it in
C:\Program Files\Java\jdk-21, which is fine. - Once the installation is done, we can check that everything went smoothly.
- Run the downloaded installer and follow the instructions. It will usually suggest installing it in
- Verify the Installation:
- Open the Command Prompt (hit
Win + R, typecmd, and press Enter). - Type the following command “java -version” and press Enter.
- If everything’s good, you’ll see something like this:
java version “21.0.0” 2023-09-19 LTS
Great! Now JDK 21 is installed and ready to go.
- Open the Command Prompt (hit
Step 2: Installing IntelliJ IDEA
Now that you have the JDK, you’ll want a nice environment to write your code in. While you can technically write Java in a text editor and run it from the command line, using an IDE makes everything easier. One of the best options for Java is IntelliJ IDEA by JetBrains.
- Download IntelliJ IDEA:
- Head over to the JetBrains site and download IntelliJ IDEA.
- Grab the Community Edition, which is free and has everything you need for Java development.
- Install IntelliJ IDEA:
- Run the installer and follow the steps. Once it’s installed, launch IntelliJ IDEA.
At the start of the installation, a window will appear where you can choose various settings. While it’s generally fine to select all the options, here’s an explanation of what each one does and how it can affect your experience:
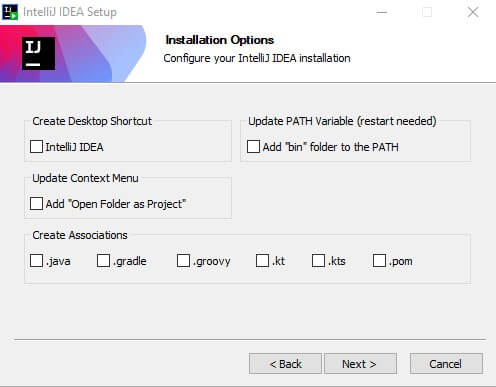
- Create Desktop Shortcut (IntelliJ IDEA)
Adds a shortcut to your desktop for quick access to IntelliJ IDEA. Useful if you prefer starting the program directly from the desktop. - Update PATH Variable (Add ‘bin’ Folder to PATH)
This option makes it possible to run IntelliJ IDEA and its associated tools (like the Java compiler) directly from the command line. It’s especially helpful if you use command-line tools in your workflow. - Update Context Menu (Add “Open Folder as Project”)
Enables a right-click option in Windows Explorer to open any folder as a project in IntelliJ IDEA. This is convenient for quickly accessing project directories without launching IntelliJ first. - Create Associations
Allows you to set IntelliJ IDEA as the default program for opening specific file types:
.java: Necessary if you work with Java files and want them to open in IntelliJ by default.
.gradle, .groovy, .kt, .kts, .pom: Useful if you work with Gradle, Groovy, Kotlin, or Maven projects.
What to Choose:
- For Basic Use: Select “Create Desktop Shortcut” and associate only .java files.
- For Full Convenience: Select all the options. This ensures IntelliJ IDEA integrates smoothly with your system, making development easier.
If you’re unsure, it’s safe to select all the options. You can always modify these settings later in IntelliJ IDEA or through your system preferences.
Step 3: Setting Up IntelliJ IDEA with JDK 21
On your first run of IntelliJ IDEA, you’ll need to do a little setup to make sure it’s using the JDK you just installed.
- First Launch:
- When you first open IntelliJ IDEA, it will ask you to choose a theme (dark or light—go with whatever feels right for you).
- Next, IntelliJ will usually auto-detect the JDK you installed. If it doesn’t, no worries, you can set it up manually.
- Manually Adding JDK 21:
- Go to
File → Project Structure → SDKs. - Click the “+” icon and choose the path where JDK 21 is installed (for example,
C:\Program Files\Java\jdk-21).
- Go to
That’s it! You’re all set up with JDK 21 and IntelliJ IDEA. Now you’re ready to start writing some Java code.